


In the world of web development, security is of paramount importance. One of the widely used authentication mechanisms is JSON Web Token (JWT). It allows applications to verify the authenticity of users and securely transmit information between parties.
The purpose of using JWT is not to hide data but to ensure the authenticity of the data. JWT is signed and encoded, not encrypted.
In this blog, we'll delve into the inner workings of JWT authentication, using an intuitive example to make it easier to understand.
Structure of JWT
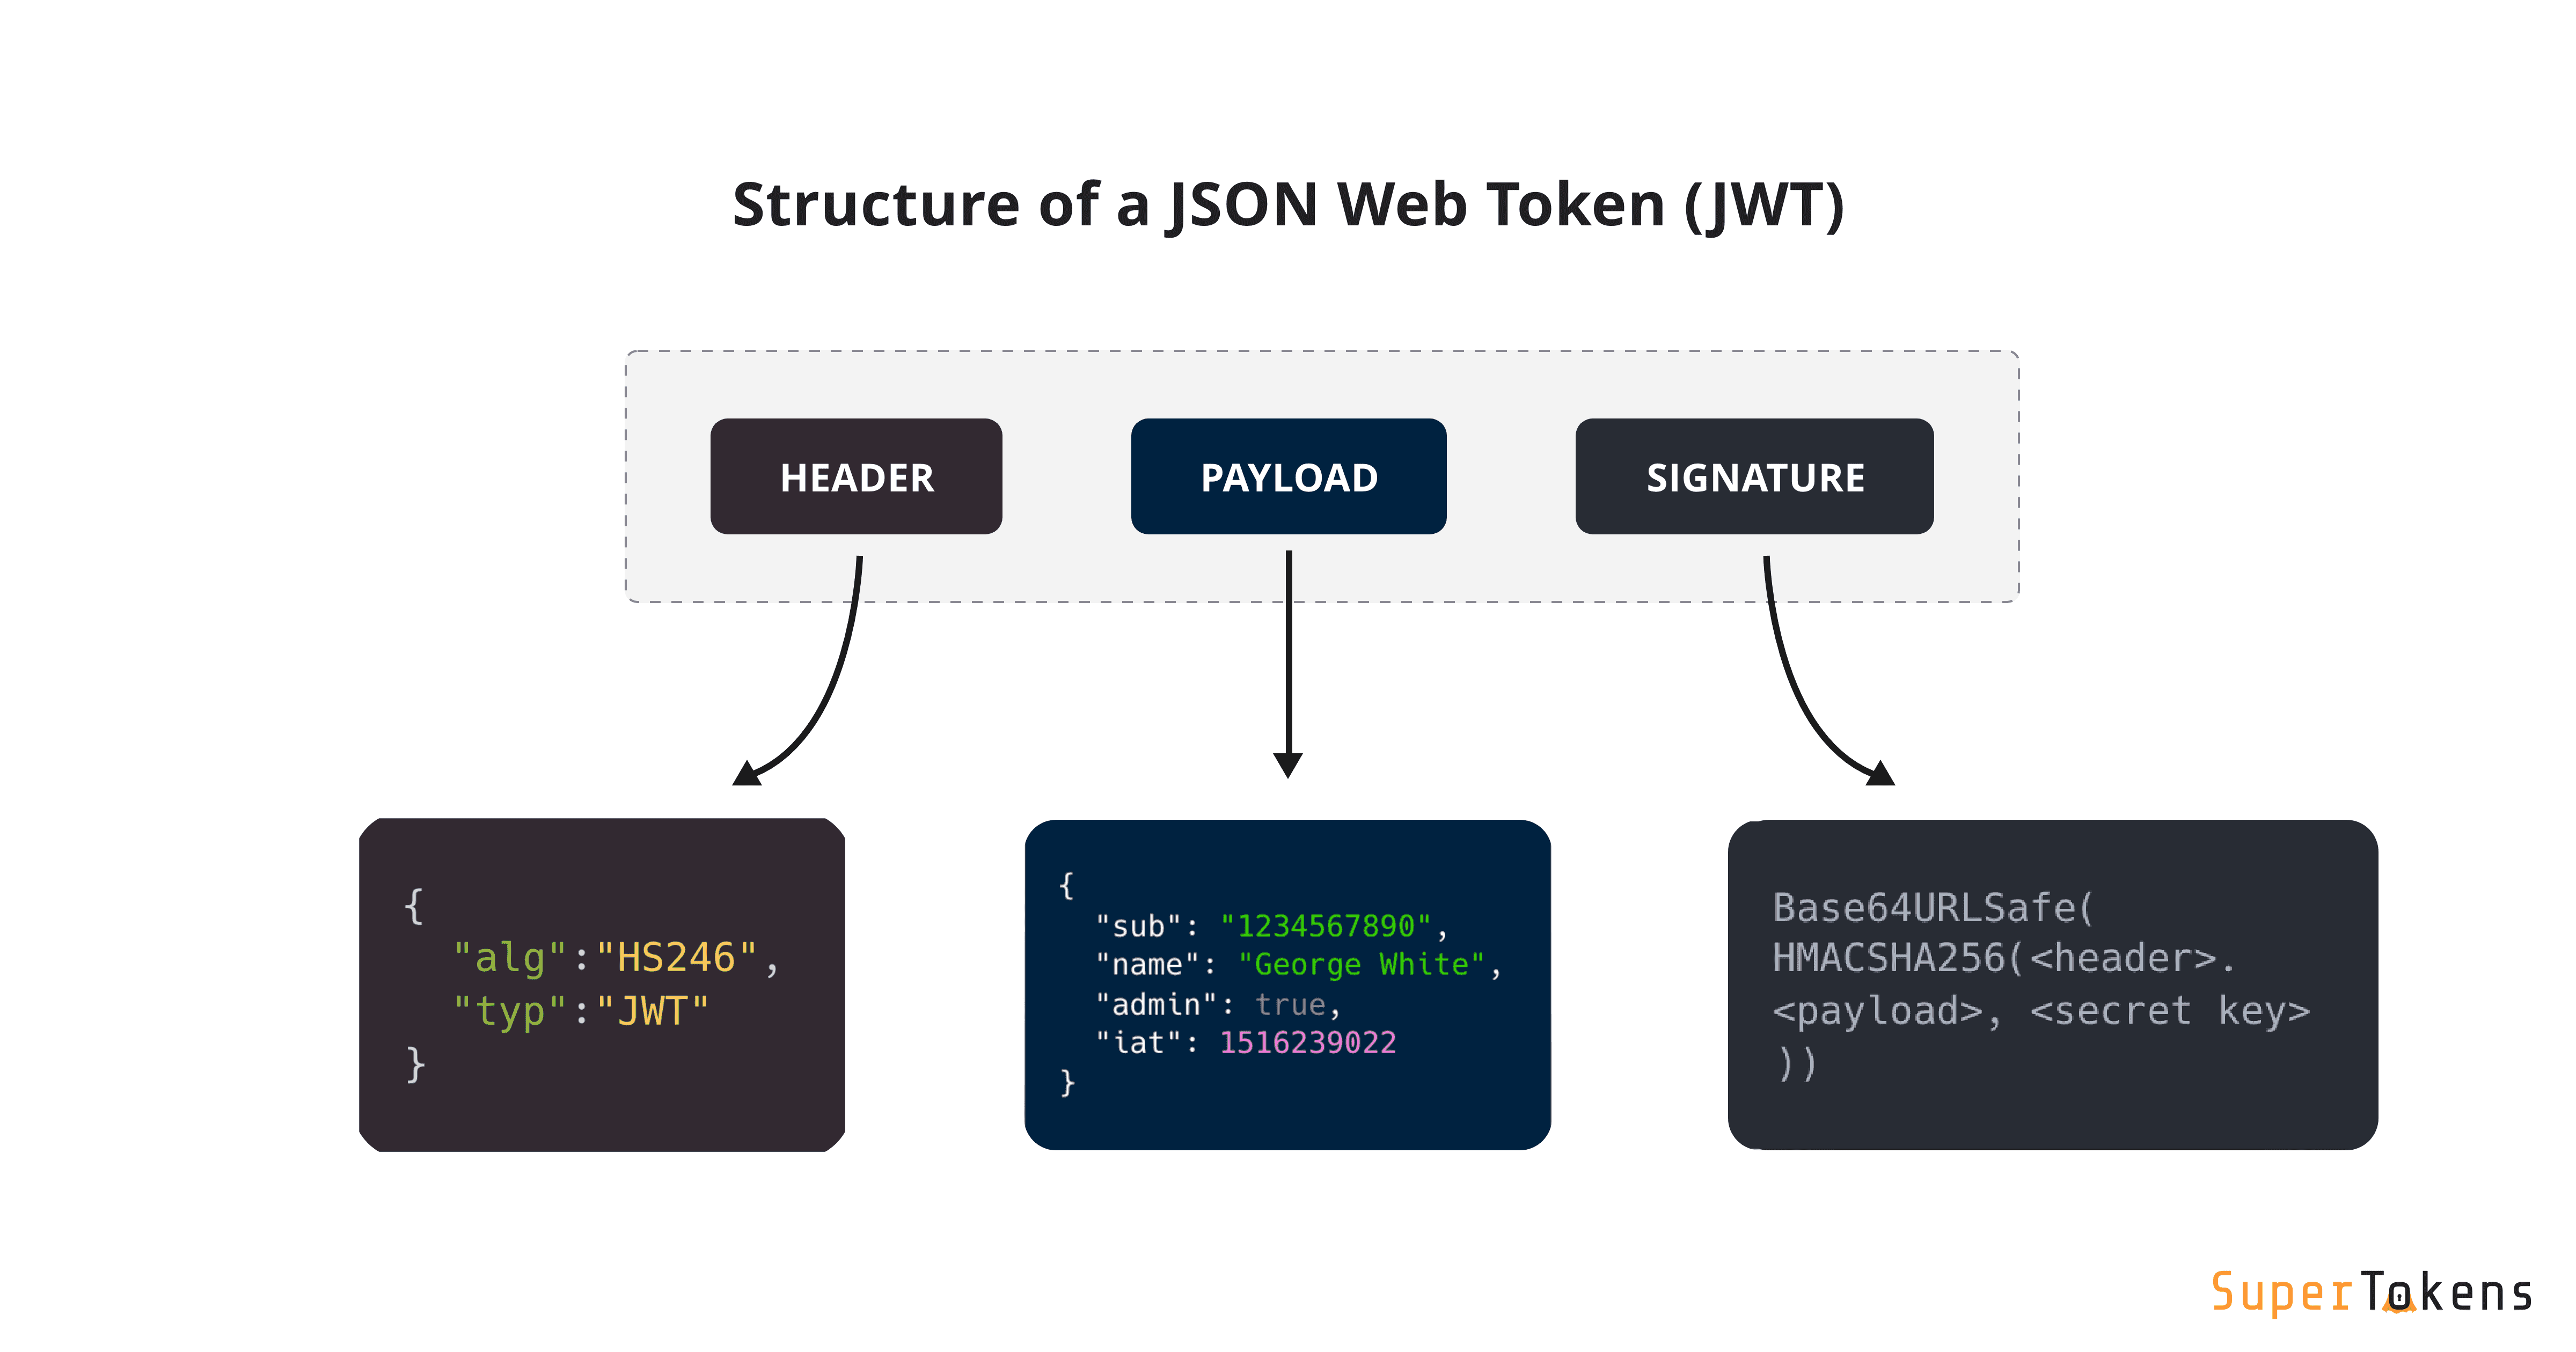
A JSON Web Token consists of 3 parts separated by a period.
header.payload.signature
2. JWT Components:
A JWT consists of three main components: Header, Payload, and Signature.
a. Header:
The header typically consists of two parts: the type of token (JWT) and the signing algorithm being used, such as HMAC SHA256 or RSA.
Example:
{
  "alg": "HS256",
  "typ": "JWT"
}
b. Payload:
The payload contains the claims. Claims are statements about an entity (user) and additional data. There are three types of claims: registered, public, and private claims.
Example:
{
  "sub": "1234567890",
  "name": "John Doe",
  "admin": true
}
c. Signature:
To create the signature part, you have to take the encoded header, encoded payload, a secret, the algorithm specified in the header, and the signing method and sign that.
Example (pseudo-code for signature generation):
signature = HMACSHA256(
  base64UrlEncode(header) + "." +
  base64UrlEncode(payload),
  secret
)
3. How JWT Authentication Works?
JWT authentication involves a process of issuing, sending, and verifying tokens. The steps are as follows:
User Authentication:
The user provides their credentials (e.g., username and password) to the server.
The server verifies the credentials and authenticates the user.
Token Issuance:
Upon successful authentication, the server generates a JWT with the user's claims and signs it using a secret key or a private key (in case of asymmetric algorithms).
The server then sends the JWT back to the client as a response.
Token Usage:
- The client stores the received JWT, usually in local storage or a cookie.
Sending the Token with Requests:
- For subsequent requests to protected resources, the client includes the JWT in the
Authorizationheader of the HTTP request.
- For subsequent requests to protected resources, the client includes the JWT in the
Token Verification:
The server receiving the request extracts the JWT from the
Authorizationheader.The server then verifies the signature of the JWT using the same secret or public key used during token issuance.
If the signature is valid, the server extracts and uses the information from the JWT's payload to identify the user and process the request.
Here is a summary of the steps:
The user provides their credentials to the server.
The server authenticates the user and generates a JWT.
The server sends the JWT to the client.
The client stores the JWT.
The client sends the JWT with subsequent requests to the server.
The server verifies the JWT and authenticates the user.

4. Example: JWT Authentication in Action:
Let's demonstrate JWT authentication with a simplified example:
Scenario: Alice wants to access her dashboard on a web application using JWT authentication.
Authentication:
- Alice enters her credentials on the login page (e.g., username: alice@example.com, password: mysecretpassword).
Token Issuance:
The server validates Alice's credentials and generates a JWT with her claims (e.g., user ID, name, role).
The JWT is signed using a secret key known only to the server.
Token Usage:
- The server sends the JWT back to Alice's browser.
Sending the Token with Requests:
Alice navigates to her dashboard and requests the dashboard data from the server.
Her browser includes the JWT in the
Authorizationheader of the HTTP request.
Token Verification:
The server receives the request and extracts the JWT from the
Authorizationheader.The server verifies the signature using the secret key.
Upon successful verification, the server processes Alice's request and sends the dashboard data back to her.
Practical Example:
Let's create a simple example of JWT authentication using Node.js with the jsonwebtoken library.
Step 1: Install Required Packages
Make sure you have Node.js installed. Then, create a new Node.js project and install the necessary packages:
npm init -y
npm install express jsonwebtoken
Step 2: Set Up the Server
Create an index.js file and set up a basic Express server with two routes: one for user login and another for accessing a protected resource (in this case, a user dashboard).
// index.js
const express = require('express');
const jwt = require('jsonwebtoken');

const app = express();
const secretKey = 'your-secret-key';

// Mock user data (replace this with a database in a real-world scenario)
const users = [
  { id: 1, username: 'user1', password: 'password1', role: 'user' },
  { id: 2, username: 'user2', password: 'password2', role: 'admin' },
];

app.use(express.json());

// Route for user login
app.post('/login', (req, res) => {
  const { username, password } = req.body;
  const user = users.find((u) => u.username === username && u.password === password);

  if (!user) {
    return res.status(401).json({ message: 'Invalid credentials' });
  }

  // Generate JWT and send it back to the client
  const token = jwt.sign({ id: user.id, role: user.role }, secretKey);
  return res.json({ token });
});

// Route for accessing a protected resource (user dashboard)
app.get('/dashboard', authenticateToken, (req, res) => {
  // Only authenticated users with a valid token can access this route
  res.json({ message: 'Welcome to your dashboard!' });
});

// Middleware to authenticate the token
function authenticateToken(req, res, next) {
  const authHeader = req.headers['authorization'];
  const token = authHeader && authHeader.split(' ')[1];

  if (!token) {
    return res.sendStatus(401);
  }

  jwt.verify(token, secretKey, (err, user) => {
    if (err) {
      return res.sendStatus(403);
    }

    req.user = user;
    next();
  });
}

// Start the server
const port = 3000;
app.listen(port, () => {
  console.log(`Server is running on http://localhost:${port}`);
});
Step 3: Test the Example
Start the server by running
node index.js.Use an API testing tool like Postman to test the endpoints.
Testing User Login:
Send a POST request to http://localhost:3000/login with the following JSON payload:
{
  "username": "user1",
  "password": "password1"
}
The server should respond with a JSON object containing the JWT:
{
  "token": "your-generated-jwt-token"
}
Accessing the Dashboard:
Copy the JWT token you received and include it in the Authorization header of a GET request to http://localhost:3000/dashboard.
Authorization: Bearer your-generated-jwt-token
If the token is valid, the server will respond with:
{
  "message": "Welcome to your dashboard!"
}
That's it! This simple example demonstrates how to implement JWT authentication in a Node.js Express server. Keep in mind that in a real-world scenario, you would store user data securely in a database and use more robust authentication methods.
5. Advantages of JWT Authentication:➕
Stateless: Since JWTs carry all necessary information within themselves, the server does not need to store session data. This makes JWT authentication stateless and scalable.
Cross-Domain Use: JWTs can be used across different domains or systems, enabling Single Sign-On (SSO) scenarios.
Reduced Database Queries: As the server does not need to query the database for session information, JWTs can reduce database load and improve performance.
6. Security Considerations:🔐
Token Expiry: JWTs should have a reasonably short expiry time to minimize the potential impact of a token being compromised.
Secure Storage: Clients should store JWTs securely, using techniques like HttpOnly cookies for additional protection against cross-site scripting (XSS) attacks.
Token Revocation: JWTs cannot be revoked once issued. If a user's privileges change or if a token is compromised, the user may continue to have access until the token expires.
7. Conclusion:
In conclusion, JWT authentication provides a secure and efficient way to verify the identity of users and transmit information between parties. By understanding the components and the process involved, developers can implement JWT authentication in their applications confidently. With its stateless nature and versatility, JWT remains a popular choice for modern web applications in ensuring robust security.
Remember, while JWT authentication is a powerful tool, proper implementation and adherence to security best practices are essential to safeguard user data and protect against potential vulnerabilities.